7 Ways to Screw Up Your Online Presence |

- 7 Ways to Screw Up Your Online Presence
- iOS6 to Support Media Upload
- A Guide to WordPress Discussion Settings
- Design: Why You Should Be As Anal About It As Steve Jobs
- Writing php code to your WordPress posts and pages the safe way
- Get Social Media Analytics for Your Site with Social Metrics
- WordPress HTML Newsletters: Create Beautiful Emails with SendPress
- 5 Bad WordPress Habits
| 7 Ways to Screw Up Your Online Presence Posted: 18 Jun 2012 01:00 PM PDT
Common Things We Do To Screw Up Our Online Presence1. Subject ourselves to life events that lead to embarrassment. Most of us who have been active on the Internet for any length of time have been able to see some of the damage that occurs when we don’t think about some of the actions that we take. Many of us just chalk up to being “young and foolish”. An example of such a thing that jumps into my mind are the kids attending Spring Break and the activities (say, Girls Gone Wild?) that they participate in during a potentially less than sober state. Having inappropriate pictures of yourself that make their way around the Internet is a sure way to screw up your online presence. 2. Get involved in legal issues. Legal issues encompass a wide variety of topics from illegal activities to public legal announcements. Here is a short list to get us thinking about a few. DUI (driving under the influence), DWI (driving while intoxicated), domestic violence, robbery, assault, bankruptcy or even something as simple traffic violations. We know these things are going to be public, but still, we sometimes manage to get ourselves into these situations. Involvement in legal issues can screw up your online presence. 3. Tweet, share and comment using language or content is considered offensive. Everyone knows what the swear words are. Here in America, we use many of these terms as part of our everyday language. Some of the cuss words might even be considered adjectives and used specifically for emphasis. Regardless, it does not make it any less offensive and realistically, it is not really necessary. Choosing to use offensive language is a choice that can screw up your online presence. 4. Affiliate ourselves with groups that others would view as questionable. We have all heard about the two things that you never discuss in public… politics and religion. That right there says enough. Think of the Internet and everything on it like a public conversation, multiplied by millions. Everything you say can and will be scrutinized, evaluated and disputed. Granted, there is a time and place for voicing opinion, even on the Internet. Affiliations are an open door and opportunity for you to sabotage and screw up your online presence. 5. Retaliate Sooner or later someone, somewhere is going to say bad things about us online. As much as we may feel the need or want to lash out, put them in their place and get even, rest assured, it is only going to make it worse. Sometimes even over defending ourselves can have the same effect. Retaliation is just another way to screw up your online presence. 6. Look for our own negative attention. Scenario: You have had some nasty and mean people say some bad things about you and you have already done everything that you can to fix the problem. But now, you are left with the residual minute pieces of data left floating out on the Internet. One of the worst things that you can do is search and track where that information is. Searching for the bad information is only going to enhance the bad information’s visibility and screw up your online presence. 7. Not claiming your own name on Social Networking Sites Anyone can easily claim any unused name as their own account where they could then spread false information or worse yet, steal your identity. Things from that account would be associated with you because the it is your name! By not claiming your own name on every social network that there is, you are leaving yourself open to screw up your online presence. How to Avoid Screwing Up Your Online Presence1. Maintain self control. Related posts:
|
| Posted: 18 Jun 2012 12:20 PM PDT Apple’s update of their operating system, iOS6, will allow upload of files through their native web browser Mobile Safari. This will mean when users of the iPhone, iPad and iPod Touch update their operating system, they will be able to upload images and video files to their posts on their WordPress site from their library of photos using Mobile Safari using a standard HTML form input. The current version of Mobile Safari does not allow for image or video upload through html forms; this however can be done using the WordPress for iPhone app. With this update, users will be able to login to the WordPress admin and publish posts with images and videos as a replacement for the WordPress for iPhone app as the app lacks support for third-party plugins and non-standard tools. A new version of the WordPress software will be released in the next few months to accommodate this update, and blogs hosted on the WordPress.com site will expect to have this update supported as well. Apple’s iOS6 will be released this autumn, which means iPhone bloggers won’t have to wait long until they can use this feature. Featured image courtesy of Yutaka Tsutano Related posts:
|
| A Guide to WordPress Discussion Settings Posted: 18 Jun 2012 10:10 AM PDT Readers like to see comments appear on your post as soon as they hit that little gray submit button, but as an administrator you want control over what is published on your site. Hence the blogger's dilemma – let the comments flow freely or send them to moderation before publishing? Of course, there's no correct answer — only what's right for you and your style of blog. In an effort to help make that decision easier, we've come up the following guide to WordPress discussion settings — the place where you tell your blog how to handle comment submission and publication.
|
| Design: Why You Should Be As Anal About It As Steve Jobs Posted: 18 Jun 2012 09:00 AM PDT Design is a good idea.Steve Jobs didn’t say that, but he could have and might have wished he did. After he took over Apple in 1997, the company’s entire ethos could be summed up with that phrase. While we could argue about what “good” means in terms of personal taste and aesthetics — and not everyone likes the look and feel of Apple products — what can't be argued is that article, a. A good idea. One good idea. So, if the process of good design could be characterized by a single word, that word would be discipline. Less is more is easy to say, hard to implement.  God Said It, iPad Wallpaper by Brett Jordan. Typeface, Myriad designed by Robert Slimbach and Carol Twombly. It took discipline for Apple not to offer 25 different laptop models instead of just the basic three. It took discipline to create the unprecedented iPhone interface, densely packed as it is with non-hierarchical information and minimal "administrative debris," as Edward Tufte calls it. To understand the impact Apple has had on WordPress design, the front end at least, all you have to do is look at the original WordPress default theme and look at Twenty Eleven now. Developers are marketing their themes and plugins using words like, elegant, minimalist, clean, simple – many of them directly inspired by Apple’s own homepage — and they're doing it without anyone finding it effete or elitist. Do a Google search for minimalist WordPress themes and check out the extensive lists. No one used to care about that. That's the legacy of Steve Jobs, too, along with everything else in the wider culture his design sense has affected. (It took a while but Google finally decided that a clean, unified design for their Web UI made sense; and look how pretty Google+ is now.) It will take a Steve-Jobs kind of discipline for you to run a successful WordPress site.So many themes. So many WordPress plugins to choose from. How many sharing buttons should we have? How many networks and services to support? All of them? Which one of the dozens (hundreds?) of Google fonts should we use? A new premium WordPress theme supports them, shouldn't we use them? Before implementing anything, following any trend, ask yourself what problems are they solving? Or are they causing problems for your readers? Just because you can change the page background color doesn’t mean you should do it. And allowing the user to change site colors and backgrounds? What problem exactly is that solving? And what does that say about the integrity of your own design decisions, not to mention your confidence in them? Because if good design must be disciplined, it's disciplined in order to solve problems, not create them.How much can you take away and still solve the main problem of quickly delivering quality content to your readers? Because if you can strip everything down to that, then you'll know you're done.  Expressive, iPad Wallpaper by Brett Jordan. Typeface, VAG Rounded designed by Gerry Barney. Case in point, close to home — the redesign of WPMU DEV. It’s not just cleaner and prettier — everything pops and the distinctive typography at large point sizes emphasizes content — it was redesigned to address the problem of unsatisfying bounce rates. How? By removing columns and focusing on one, leading the reader down the page. (I think the implementation of the screenshot slideshow is a step backward, however. You’ve already got the reader moving down the page, why bounce back up? That introduces spatial confusion — as in, where am I?) Still, you've got something that Steve Jobs wouldn't have winced at, and you didn’t have to wear jeans and black turtlenecks every day to achieve it. You've got good design. iPad wallpapers by Brett Jordan. Creative Commons License. |
| Writing php code to your WordPress posts and pages the safe way Posted: 18 Jun 2012 08:00 AM PDT If you’re handy at writing php code to your WordPress blog, you’ll know that there are several ways of getting it done:
A problem…One of the major drawbacks of the methods listed above can rear its ugly head if you’re running a site or network with multiple authors, editors or admins. Once in your site’s backend, pretty much anyone can muck with your code. Not good. A solution…If you want to write custom php code to your blog to enhance the experience for users of your WordPress site, and also want to do it safely, you’ll love the Shortcode Exec-PHP plugin. One of the best things about this plugin is that only admins can create shortcodes with it. This is a must-have for sites or networks with multiple contributors or authors. This very handy plugin enables you to create your own shortcodes to use in any page, post, comment, widget or RSS feed. Plus, anyone who can create or modify posts, pages and/or widgets, or can write comments, can use the shortcodes you create. It’s not just for multi-author sites either. If you are the sole author on your WordPress site or network, and if you like to offer custom features or functionality to your users, you’ll love it. Some additional features of the Shortcode Exec-PHP plugin:
As an example, if you’re running a Buddypress site, adding the code in the image below would create a shortcode to display the logged-in user’s avatar wherever you insert the shortcode.
Shortcode Exec PHP is available for download from the WordPress repository here: http://wordpress.org/extend/plugins/shortcode-exec-php/ Photo credit: Freerangestock.com No related posts. |
| Get Social Media Analytics for Your Site with Social Metrics Posted: 18 Jun 2012 07:00 AM PDT
Don’t get me wrong – I try to resist the temptation, but I am ashamed to say that checking up on my Analytics is often the first thing I do in the morning, and the last thing I do at night. With that in mind, you might consider it rather masochistic to review an analytics plugin, but hell – why not feed the beast? Social Metrics is a simple plugin that allows you to analyze which of your posts perform the best in terms of social media exposure. Once you have installed the plugin, just click on the Social Metrics link in the sidebar and you will be presented with a list of your most recent posts, plus their share numbers across the most popular social networks. Here’s a screenshot from my blog: Once you have this information to hand, you can make more informed decisions regarding your social media strategy. For instance, I can see that my posts perform very poorly on StumbleUpon and Digg. Therefore, it might be worth me promoting these posts via my own accounts to see if anything positive would result. Furthermore, I can see that one post in particular (22 Success Stories) performed well on Twitter and Facebook. I know that this is because I spent a lot of time asking the “success stories” mentioned in the post to share it. It just goes to show how effective a little networking can be. Settings IrritationAlthough this free plugin is pretty darn handy, there is however something about it that really bugs me. There is a settings screen, but all of the options are blanked out (i.e. you can’t adjust any of the settings). I had a sneaking suspicion that these settings were only available to owners of the premium plugin, and I discovered that this is the case, after having made an enquiry. Now, I have no problem at all with people releasing premium plugins (quite the opposite), but as far as I can see, there is no indication in the plugin as to why the settings are blanked out. So the user is left to guess – many may think there is some sort of bug. Premium features include the ability to sort all of your posts by popularity, search functionality, report downloads, and more. It may be worth your hard-earned cash, with a single license available for $27, and an unlimited license available for $47. Either way, if you are a social networks nut, Social Metrics is something you should probably check out. Creative Commons image courtesy of khalid Albaih Related posts:
|
| WordPress HTML Newsletters: Create Beautiful Emails with SendPress Posted: 18 Jun 2012 06:45 AM PDT
SendPress is an exciting new plugin that provides a lightweight, user-friendly newsletter/email system for WordPress. Not only does it let you create and send beautiful HTML emails, but it also includes everything you need to manage your email lists, subscribers and stats and reports. SendPress was designed to be very user-friendly, featuring:
The default email template is attractive, but you can also use the theme styler to customize and brand your templates as much as you like. You can manage your subscribers and lists directly through the WordPress dashboard, including importing and exporting: SendPress goes one step beyond what many other WordPress newsletter plugins provide in that it actually tracks each email's results, including Opens, Clicks, Bounces and more. You can access this information in your dashboard through the reports that SendPress produces. Using SendPress is a great way to streamline your website and email newsletter. Future releases of SendPress will include autoresponders, advanced reports, list segments, Google analytics tracking, scheduled sending and more. They are aiming to deliver enterprise level email features to WordPress sites. Find out more at the SendPress website and download it for free from the WordPress plugin repository. Related posts:
|
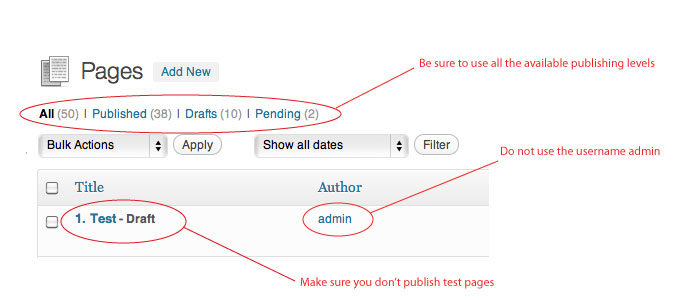
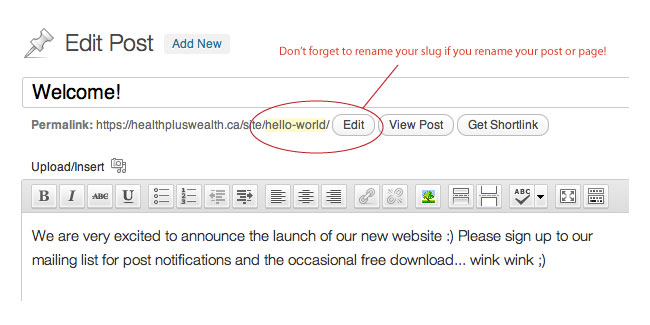
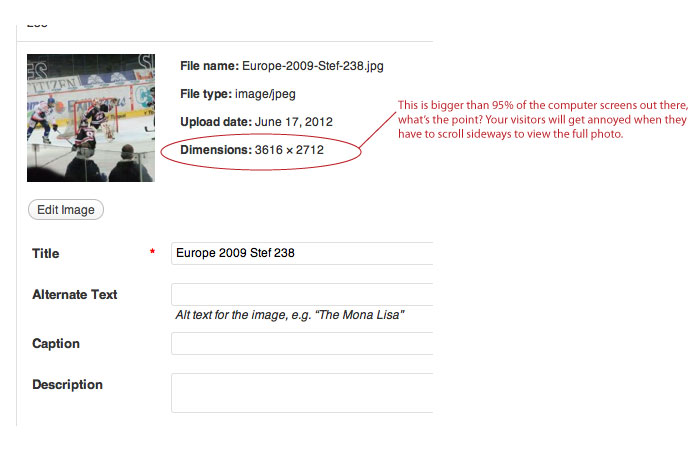
| Posted: 18 Jun 2012 05:45 AM PDT As a full-time WordPress developer I have seen all sorts of bad habits by other developers and contributors. Some of them are a quick fix while others you hope to catch before they pile up into a mountain of editing. 1) Improper deletion of posts and pages I am really nit picky when it comes to SEO and I if I had a nickel for every time I found “private pages” listed on Google I’d be rich. Do you ever find yourself publishing a test page or a test post while developing a theme or a plugin? Perhaps even an unfinished draft or an expired post. Removing a page from the navigation bar does not delete the page and while you may think that doesn’t matter the truth is search engines like Google will have already visited the page, cached it and still have it listed when people search for you. WordPress comes with 5 status levels for posts and 4 status levels for pages yet more often than not, all I ever see being used is the published state which makes it publicly available (login not required). This can not only be embarrassing but weigh you down heavily in SEO. So unless you are blocking the entire site from search engines and the public with an under construction splash page and a robots file that instructs search engines not to list anything…. you should probably make more use of the multiple post/page levels. If you are publishing something for preview, unpublish it when you are done and set it to draft or pending review. If you want to delete a page or post, don’t just remove the navigation buttons… delete the page or post and know that you can always retrieve it from the trash status level. 2) Improper Renaming of Pages & Posts Another common mistake I see every so often is a post or page slug that has a different name than the post or page title. Now this is often good practice if you want to optimize your urls for SEO just be careful not to forget to make your edits! What do I mean? I mean don’t just rename the default post title in WordPress from Hello World to YOUR NEW HEADLINE you need to be sure you do the same thing for your page or post slug… that’s the url you’ll be using to link people to this page or post. 3) Uploading Massive Images Now just because your server can handle large file sizes doesn’t mean you should be lazy and leave the resizing to WordPress. If you’re on a shared hosting plan (a really cheap one) you might be experiencing problems and not be able to upload your pictures at all. If that’s happening you’re likely getting an error along the lines of “Tried to Allocate _____ MB Memory – Memory Exhausted” or even “Upload failed! The uploaded file exceeds the upload_max_filesize directive in php.ini”. Check to see if you are uploading images that are no more than 72 DPI (that’s low resolution for the web). If you’re spoiled like me and have you’re own dedicated server, you might find that your images are consuming a significant amount of disk space and are now slowing down your backups and recovery time. I would always recommend resizing your images on your computer and then uploading them to WordPress. In fact I would even recommend cropping a thumbnail for your posts on your computer and uploading it as a dedicated “featured image”. Keep your website as light as possible for fast page loads and quick backups/recoveries. 4) Modifying CSS within Plugins instead of Themes When I first got started with WordPress I used Firebug to map out all the CSS that was being loaded into my pages and found some coming from plugins and some coming from the theme I had enabled. Little did I know that I could override the CSS in my plugins within my own theme CSS. I used to lose my CSS changes every time I upgraded plugins because the changes were made within the plugins’ files. Life would have been so much easier had I simply copied the class or id over to my theme’s css file. You can override the attributes with an important declaration like this: Original plugin css (the file I use to edit and lose with every upgrade) .pluginclass {background-color:white;} My theme’s stylesheet (the css file I use now to override plugin classes) .pluginclass {background-color:black!important;}
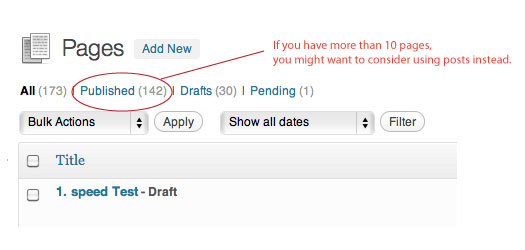
5) Too Many Pages, Not Enough Posts Some people shy away from posts because it introduces post meta data such as publishing date, author, category and tags. That then pushes them over to pages unless they have their own custom post types. Sometimes I’ve seen a ridiculous amount of pages which could have been better organized as posts into categories. If you are going to have more than 10 pages I would advise you consider grouping some of your pages as posts into categories. You can always remove the meta data from your theme’s post templates and you can disable comments. Take a restaurant menu for instance, you could create categories for the various menus like “appetizers”, “drinks”, “entrees”, etc. and have a post for each menu item with it’s own image. In the context of an educational institution you might have categories for all your programs such as “2 year programs” and “3 year programs”. That will allow you to link to a category that will list all the 2 year programs or all the 3 year programs. It also enables the native WordPress search as it doesn’t list pages in its search results. Grouping posts into categories not only makes it easier for your visitors to navigate and search but search engines like it too :) Related posts:
|
 There are a lot of ways that other internet users can maliciously mess with your online reputation. There are just as many techniques that you can use to repair the damage they do. But let’s put all the nasty and mean people aside for a moment and think about some of the actions we may unknowingly take ourselves that lead to us screwing up our own online presence? What are the things that we sometimes do to screw up our online presence and what can we do to avoid them?


 Analytics are all the rage, aren’t they? Let’s be honest – most of us are forever checking on our stats to see how our sites are performing.
 It’s amazing what you can build with WordPress. Developers are constantly extending the platform to be able to provide functionality previously available only through third party services.


| You are subscribed to email updates from Wordpress Themes, Plugins, Tutorials & More - WPMU.org To stop receiving these emails, you may unsubscribe now. | Email delivery powered by Google |
| Google Inc., 20 West Kinzie, Chicago IL USA 60610 | |
No comments:
Post a Comment